Few months ago I purchased a used ICOM IC-706MKIIG in good condition and for a quite reasonable price. The primary reason for this acquisition was that l am spending 2.5 hours every day driving a car between my home and my work place and I wanted a mobile radio setup for shortwaves. Because of the detachable front panel the IC-706 is extremely suited for this purpose.
The radio came with the optional separation cable but there was something strange about the cable. It was cut in the middle and a set of RJ-45 connectors were mounted on the cable. The person who sold me the radio told me that it was for a Remote Rig setup, where you leave that radio at home connected to your big bad-ass antennas, take the control panel with you and connect to the radio over the Internet using the Remote Rig boxes.
I found this idea very appealing and decided to build such a remote kit for myself. In case you are wondering why I am not just buying the COTS version, here are a few reasons:
- The COTS remoterig kit costs more or less the same as my IC-706 did. I’m not saying it’s not worth it; it’s just too much for an accessory.
- I have a very good idea what it takes to built such a kit.
- I have a few Beaglebones just waiting to be used in a project.
- When finished I have a platform where I can include codec2/freedv digital voice mode, something I can not do with a closed COTS kit.
The connection
Searching the web revealed that the connection between the radio and the front panel consists of:
- 8 volt power supply from radio to front panel
- A bi-directional serial interface
- A discrete power line from the front panel to the radio (goes to ground when power button is pressed).
- Audio from radio to front panel
- Audio from microphone to radio
A good reference is the SM7LCB remote IC-706 page as well as the Microbit wiring diagram for keeping the cable compatible with their boxes. OK1ZIA has posted some excellent documentation of the serial traffic between the radio and the the front panel.
The serial interface is used to exchange settings between the radio and the front panel. This must also include the PTT signal as there is no discrete connection for this. According to SM7LCB, the serial protocol and format is similar to the ICOM CI-V, though it really doesn’t matter. All we need is two boxes that can route data between a serial interface and a network interface as illustrated on the diagram below. Of course, the complete setup will also require two-way encoding of the audio as well as the power on/off signal.

Proof of concept
I decided to make a quick proof concept to convince myself that this could really work and that I wasn’t underestimating the task. To that end I have replaced the serial connection between the front panel and the radio with a set of FTDI USB-serial cables connected to a PC. The PWR button and 8 volt connections remained between the radio and the panel, the audio was not connected.
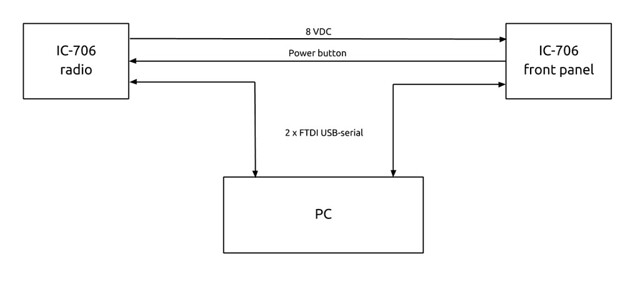
With this setup I could intercept the serial communication, study it and route it as I wished. Initially I just sent the data from one serial port to the other but eventually I created a simple client and server applications and routed the serial data through a TCP connection. The video below shows a recording of the client and the server running on the same PC. You can see a significant increase in traffic when I am turning a dial or pressing some buttons on the front panel.
Just to be clear, the audio on the video comes from an SDR running on the PC and not from the IC-706.
I have decided to make the source code available on Github already now even though it is of very limited use in its present form. You will find a very basic server and client application that is neither robust nor safe.
In the coming weeks I will start moving the setup over to the Beaglebones, implement the power on/off signals and add the audio codec.