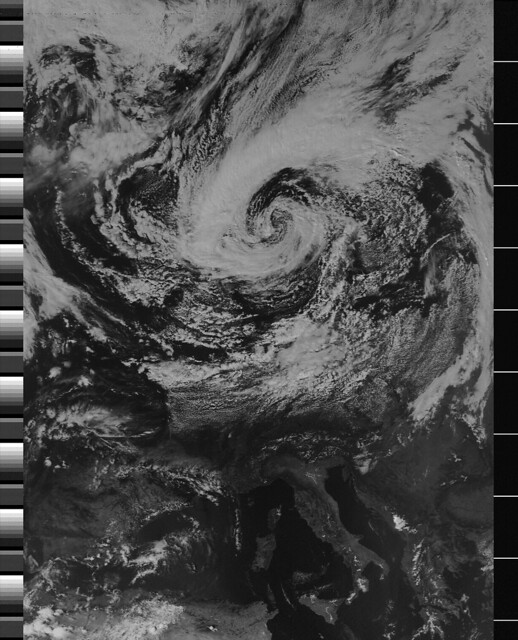
 One of the great advantages of software defined radio receivers is that tuning receiver settings is a matter of adjusting software parameters. Gqrx is no different here and has optimal settings built in for weather satellite reception. This tutorial describes how to receive automatic picture transmissions (APT) from NOAA weather satellites using Gqrx SDR, record them to a WAV file, and finally decode the images using the free and open source Atpdec decoder. If you follow this guide you can end up with very nice results such as the one shown at the end.
I have used the Funcube Dongle with an Arrow antenna for this example but any receiver hardware supported by Gqrx can be used, provided that it can receive the required bandwidth, which is around 40 kHz.
Step 1: Reception and recording
NOAA APT transmissions are analog transmissions. The data coming from the imaging sensors is used to amplitude modulate a 2.4 kHz sub-carrier, which is then used to FM modulate the VHF carrier at 137.x MHz. The FM deviation is 17 kHz and using the Carson bandwidth rule we get a channel bandwidth of
BW = 2 × (17 + 2.4) kHz = 38.8 kHz
Hence the requirement for 40 kHz bandwidth. In fact, a few kHz more will not hurt but allow to track the signal during the whole pass without any active Doppler tuning.
The Funcube Dongle uses 96 ksps sample rate and has an effective bandwidth of 80 kHz. Thus there is just about enough bandwidth to have the APT signal on one side and avoid interference from the DC spike, which can not be completely eliminated at these frequencies.
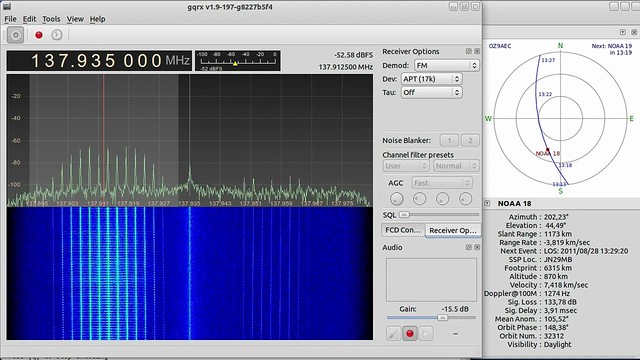
Start by tuning the FCD PLL to 23 kHz above or below the satellite frequency. For example, NOAA-18 transmits on 137.9125 MHz and I tuned the FCD to 137.935 MHz. Then tune the channel filter so that the RX frequency will correspond to the satellite frequency (see the Gqrx screenshot above).
In the demodulator options select FM with 17k deviation and disable de-emphasis by setting the filter time constant tau to 0.
When the satellite comes in range, start the audio recorder by pressing the red dot in the Audio settings. Note that the red dot in the toolbar is the I/Q data recorder – we don’t need that here.
Watch video on YouTube.
As you can see I have very good signal above; about 20 dB C/N when the satellite is close to the horizon and almost 40 dB C/N at the time of closest approach. The recording was made in a relatively quiet area and I had LNA gain reduced to 10 dB.
Don’t forget to stop the audio recorder when the pass finishes, otherwise the WAV file will have corrupt header.
Note that Doppler tuning is not necessary as long as the channel filter is wide enough. This is an advantage (maybe the only advantage?) of FM modulation: The Doppler shift will be seen as a moving DC offset in the audio but the audio amplitude, which is the important parameter for APT, will not be influenced. This assumes that the audio level is sufficiently below the maximum level, otherwise a DC shift will saturate and clip the samples. You may have to experiment with the settings before you find the optimal volume; however, the -15 dB audio gain I am using will probably also work for you.
Step 2: Convert the recorded audio
Gqrx records audio WAV files at 48 kHz. We need to convert it to 11.025 kHz WAV. If you have a favorite conversion program just do it your way. The quickest way to do this is using Sox:
sox input.wav output.wav rate 11025
Couldn’t be easier, could it?
Alternatively, you can import the WAV file into Audacity where you can also cut any noise from the beginning and the end. In audacity you need to use Track → Resample, then also change the project rate from 48 to 11.025 kHz (maybe it is sufficient to change the project rate?). When finished export the audio to a new WAV file.
In case you end up with a corrupt WAV file (gqrx is in testing phase 😉 you can still use VLC or Sox to resample it.
Step 3: Decode image from audio recording
Now that we have an 11.025 kHz WAV file we can use Atpdec to decode the APT image from it. The latest stable version is 1.7 from 2005, but it appears to be sufficient and is easy to build compared to the latest code in the CVS repository. If you read the README file you’ll see that it requires libsndfile and libpng to compile. All of these are pretty standard and available for all Linux. Remember that we need the -dev or -devel packages when compiling against libraries, i.e. libsndfile-dev or libsndfile-devel.
The README file also contains necessary information about the usage of atpdec. I have used
atpdec -s 18 -i ab recording.wav
but you can of course use whatever you wish. Note that NOAA-19 is not included in Atpdec version 1.7, for that you will need the latest version from CVS. At the time of writing, the code in CVS does not compile for me.
Step 4: Enjoy and experiment
Below you can see an image I received from NOAA-18 on August 28, 2011. As mentioned above, I used the Funcube Dongle and a simple Arrow antenna.
Once you have mastered basic reception, you should start experimenting with the receiver settings. I would also be interested to see scripts / hacks that perform automatic recording and decoding. I guess that will be easier once I implement the scheduler in gqrx.
In any case, I hope you’ll have fun with this area of space communications!
Changes
2012/07/14: Added example sox command to resample audio from 48 to 11.025 kHz.
2012/07/15: There is now an article about how to do this using RTL-SDR as well.
Thanks, it worked perfectly!