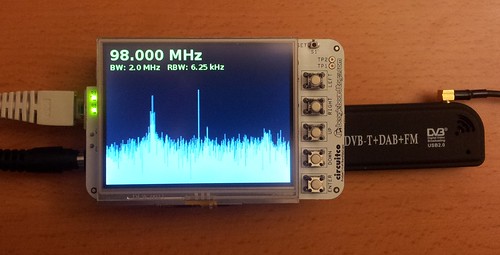
Take a Beaglebone, add an LCD cape and a £10 USB TV dongle, install librtlsdr and my rtlizer software and you have an awesome hand-held, real-time spectrum analyzer.
Introduction
Few weeks ago I gave a talk titled Software Defined Radios for VHF, UHF and SHF at the annual Danish VHF-meeting. My plan was to present the commonly available SDR hardware and software in a non-death-by-powerpoint way, and as an extra twist I have decided to bring a demo that would motivate people to move on beyond installing sdrsharp on a wintendo PC. I wanted to show people that with the availability of cheap SDR devices like the RTL2832U-based DVB-T dongles (aka. rtl-sdr) and affordable embedded computing devices like the Beaglebone, awesome things can be done even on a hobbyist budget.
The demo was to be an rtl-sdr based spectrum analyzer running on a Beaglebone and to prove my point I didn’t start until 3 days before the talk. Thus, I had two evenings and one full day to create the spectrum analyzer and to prepare my talk. I knew it could be done since I already had librtlsdr compiled and running the Beaglebone – all I had to do was some FFT and a simple GUI.
Parts list
Here is a complete list of hardware and software components.
Hardware:
- Beaglebone
- LCD3 cape – I got mine for €62 from Tigal.
- RTL2832U-based DVB-T dongle with R820T tuner – I bought mine for £8 from CosyCave.
- Power supply – The LCD and the rtlsdr dongle will require additional power and you can’t power the whole thing via a single USB cable. An external power supply is highly recommended.
Software:
- Linux for the Beaglebone – The Angstrom demo image will work but you can also try my nanosdr images
- libusb – Already available on Angstrom.
- librtlsdr – Compiled on target or using my bitbake recipe (see next section).
- Gtk+ 2 – Already available on Angstrom.
- kiss_fft – A simple FFT library that is embedded into rtlizer.
- rtlizer – For now it must be compiled on target.
Using the Angstrom demo images
The quickest and easiest way to get this working is to use an existing Angstrom demo image available from the Angstrom site. I started out with the GNOME image and that works fine except that it is very difficult to use on a 320×240 touch screen.
Once you have the demo image up and running, I recommend that you proceed by compiling rtl-sdr and rtlizer directly on the Beaglebone. The GNOME image has all necessary development packages are already installed.
Check out and build rtl-sdr following the instructions on their wiki:
  $ git clone git://git.osmocom.org/rtl-sdr.git
  $ cd rtl-sdr/
  $ autoreconf -i
  $ ./configure
  $ make
  $ make install
  $ ldconfig
The above assumes that you are logged in as root. If not you need to add sudo in front of the last two steps. Plug in your device and test it using rtl_test.
Next, continue with building rtlizer:
  $ git clone https://github.com/csete/rtlizer.git
  $ cd rtlizer
  $ ./build-target
That’s it, you can now execute rtlizer in a terminal within the GNOME desktop.
If you want to keep using this image you can configure rtlizer to be started automatically when you log in. Otherwise you can add a shortcut to the desktop which will make it possible to start it manually using the buttons available on the LCD3 cape.
Using my custom Linux images
If you want a fast booting minimalistic image you can try my Linux images. At the time of writing it is still very much a work in progress but the following guide may help you get started.
First, you need to set up an OpenEmbedded environment to be able to build Angstrom Linux distributions. The easiest is to use the setup-scripts from the Angstrom distribution:
$ git clone https://github.com/Angstrom-distribution/setup-scripts.git $ cd setup-scripts $ MACHINE=beaglebone ./oebb.sh config beaglebone $ MACHINE=beaglebone ./oebb.sh update $ . ~/.oe/environment-angstromv2012.05
Test your setup by building a simple systemd console image for the Beaglebone:
$ bitbake systemd-image
Even though you don’t need this image for rtlizer, it is a good exercise and besides, it will create a super lightweight console image for you that can boot the Beaglebone in less than 5 seconds. It is good to have this image as a reference if you plan to experiment further.
Check out the code from the nanosdr repository:
$ https://github.com/csete/nanosdr.git
Update setup-scripts/conf/local.conf to include the nanosdr/Angstrom/ directory:
# My local Bitbake recipes BBFILES += "/path/to/rtlizer/Angstrom/*/*.bb"
You may have to rerun the update and sourcing steps above, after that you can build my sdr linux image:
$ bitbake nanosdr-dev-image
I recommend you stick to the nanosdr-dev-image for now because it is necessary to build rtlizer on the target.
The video below shows a demo of rtlizer running on my nanosdr-dev-image. It runs at 20 frames per second with a CPU load around 30% (without any optimizations).
Watch video on Youtube.
Note that the sdr images do not include any display or window managers. They boot up in text mode where after you can launch rtlizer using xinit.
There is also an rtlizer.service file that you can use to launch rtlizer using systemd. I don’t have any step-by-step guide for that yet, but there are various tutorials out there, see for example this one.
I have written down this guide from memory, if you encounter anything wrong or have some additions please let me know.
Closing remarks
Clearly, seen from a performance point of view, this spectrum analyzer is just a toy and nowhere near a Tektronix or a Rohde & Schwarz. On the other hand, it is built from open source hardware and software components (except the rtl-sdr dongle) and from a functional perspective we can implement pretty much anything we want. For example, this device already has an SSH server built in and we could easily add a web server, etc.
As for rtlizer, it is extremely simple and it can’t do much yet. I plan to do a few updates to add more functionality, support for rotary encoders, configuration options and of course a bitbake recipe to allow building it as part of the sdr linux images. Otherwise I leave it up to you to hack it according to your needs, but please let me know if you do something cool with it.