Please note that the information in this article is out of date and needs updating. I will do my best to update it soon.
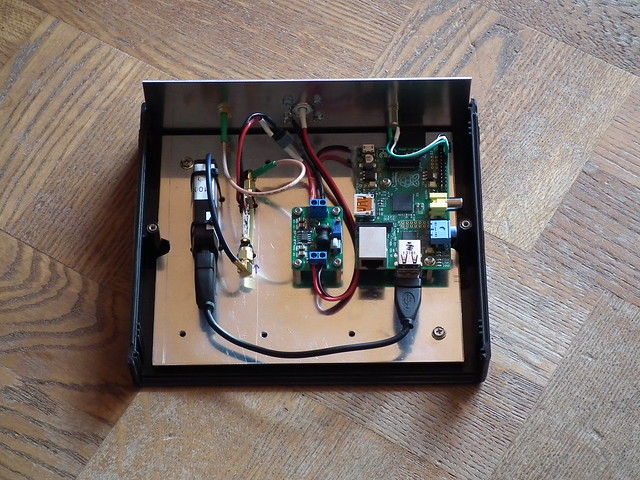
In a previous post I wrote about using the UT-100C DVB-T modulator on linux and I promised to follow up how to use the modulator with live video sources. In this post I am going to describe how to setup the modulator on a Raspiberry Pi equipped with a RaspiCam camera module, effectively turning the Pi into a live HDTV transmitter.
The setup can be made small enough to be carried by a medium size drone and the range can be increased using power amplifiers. If you do that be sure to comply with the radio regulations applicable in your country. In particular, transmitting with significant power in the UHF TV bands will most likely get you into trouble. Your best bet is to get a ham radio license and use the 23 cm band.
The setup I am using performs the following tasks:
- Capture H.264-encoded video from the camera using the raspivid application.
- Convert the H.264 bitstream to constant bitrate and DVB compliant MPEG-TS stream using ffmpeg 2.2.2.
- Send the MPEG-TS stream to the UT-100C modulator using tsrfsend application.
- In my own setup I also use a 20 dBm power booster to increase the range.

The idea for this setup, in particular for using the latest ffmpeg for MPEG-TS generation, comes from Evariste F5OEO who posted it on the Viva DATV forum. In fact, he has made a complete Raspbian image available for download for those who want a quick and easy way to get started. While his image works well, it will limit you to the software available at the time when he built the image.
To get an idea of the video quality you can expect from this setup check out these test recordings I have posted on Youtube. Be sure to check out the recording of the HEAT 2X rocket being fueled with liquid oxygen at −180 °C. They were all recorded over the air using the Rocketcam 1 prototype setup and an RTL2832-based DVB-T dongle with modified drivers to work in the 1.3 GHz band.
In the following sections I will describe each component of my setup.
Step 1: Raspberry Pi and camera
The first thing to do is to ensure that you have your Raspberry Pi up and running with an up to date Raspbian image and the RaspiCam. You can use this tutorial on the Raspberry Pi website. You should definitely get acquiantened with the raspivid application that is used to capture H.264 encoded video with the camera module. It is a great tool and you will also find it useful for other tasks.
I suggest you create a working directory, for example ~/dvb/, where you can put the scripts and binaries used for the DVB-T setup.
Step 2: The UT-100C driver
You can download my binary driver built for kernel linux-rpi-3.12.19+: usb-it950x.ko.
I have also posted instructions how to build the driver on the target (Raspberry Pi). You may have to do this if my driver is not compatible with your device.
In either case put the usb-it950x.ko file in the working directory, e.g. ~/dvb/. You can test the driver by plugging in the UT-100C dongle and loading the module:
$ cd ~/dvb
$ sudo insmod ./usb-it950x.ko
To remove the module:
$ sudo rmmod ./usb-it950x.ko
Step 3: Get ffmpeg 2.2 or later
At the time of writing ffmpeg seems to be the only open source application capable of muxing H.264 video into DVB compatible, constant bitrate MPEG-TS. The downside of the ffmpeg muxer is that it adds a 5 second latency to the transmission. We’ll have to work on this.
My binary built with libc-2.13 is available here: ffmpeg. However, here you really have the opportunity to learn something by cross compiling your own ffmpeg. Just follow the instructions from the ffmpeg wiki which is what I did with the following choices / changes:
- I didn’t build any addon libraries as I only want to use ffmpeg for TS muxing.
- During menuconfig of the crosstoll-ng under C library select eglibc 2.13 or whatever version comes with your Raspberry Pi.
You can find which version of libc you got on you pi by running the following command in the Raspberry Pi console:
$ ll /lib/arm-linux-gnueabihf/libc-*
-rwxr-xr-x 1 root root 1200240 Mar 20 23:00 /lib/arm-linux-gnueabihf/libc-2.13.so*
As you can see I had version libc 2.13 installed at the time of writing this article.
Put the ffmpeg binary(ies) in the same working directory where you got the and check that it works:
$ cd ~/dvb
$ ./ffmpeg -v
ffmpeg version 2.2.2
built on May 29 2014 23:17:41 with gcc 4.8.2 (crosstool-NG 1.19.0) 20130603 (prerelease)
configuration: --enable-cross-compile --cross-prefix=/home/alc/embedded/rpi/ffmpeg/ctng/
arm-unknown-linux-gnueabi/bin/arm-unknown-linux-gnueabi- --arch=armel --target-os=linux
--prefix=/home/alc/embedded/rpi/ffmpeg/deploy
libavutil      52. 66.100 / 52. 66.100
libavcodec     55. 52.102 / 55. 52.102
libavformat    55. 33.100 / 55. 33.100
libavdevice    55. 10.100 / 55. 10.100
libavfilter     4.  2.100 /  4.  2.100
libswscale      2.  5.102 /  2.  5.102
libswresample   0. 18.100 /  0. 18.100
Step 4: tsrfsend
Finally, we need an application that can talk to the UT-100 modulator, configure it and send the MPEG-TS steam to it. You can write your own application based on the API docs that come with the driver package or use the tsrfsend application included in the UT-100C Opencaster Bundle.
There is no license included with the tsrfsend application so I can only assume full copyright; however, I hope I will not get into trouble for sharing my armhf binary with you: tsrfsend.
If you have the sources you can simply build it on the Raspberry Pi, or try the cross compiler you created for ffmpeg. In either case you should apply the patch that I have posted on the Avalpa forum.
Put the tsrfsend binary into the same working directory where you put the driver and the ffmpeg application.
A few hints how to test the tsrfsend application are available in my previous post.
Step 5: Connecting the pieces
We need a way to (1) send H.264 video from raspivid to ffmpeg and (2) send the MPEG-TS from ffmpeg to tsrfsend. Since all these applications can operate on files the easiest way to connect them is using named pipes (aka FIFOs).
We can create two named pipes in the working directory:
pi@raspberrypi ~ $ cd ~/dvb
pi@raspberrypi ~/dvb $ mkfifo videoes
pi@raspberrypi ~/dvb $ mkfifo videots
pi@raspberrypi ~/dvb $ ll
total 0
prw-r--r-- 1 pi pi 0 Jun  4 22:37 videoes|
prw-r--r-- 1 pi pi 0 Jun  4 22:37 videots|
pi@raspberrypi ~/dvb $
The names videoes and videots refer to video elementary stream and transport stream respectively. Having the pipes in place we can now launch the raspivid, ffmpeg and tsrfsend applications sequentially using the pipes for input and output.
In the following example I use a 6 MHz channel, QPSK modulation with rate 1/2 FEC, 1/4 guard interval and 8k FFT. With these parameters the channel capacity is 3.732 Mbps which is what we set the ffmpeg muxrate to. THe video rate must be lower than that and leave sufficient margin for bitrate fluctuations. Therefore, I have set raspivid to capture 1280×720 pixel frames at 30 frames per second and 3.3 Mbps video bitrate.
The following lines should be copy & paste-able into a terminal or a script:
raspivid -n -w 960 -h 720 -b 3300000 -t 0 -fps 30 -g 90 -pf high -ih -o videoes &
./ffmpeg -loglevel error
 -framerate 30 -i videoes -minrate 3.1M -maxrate 3.5M -vcodec copy
 -f mpegts -mpegts_original_network_id 1 -mpegts_transport_stream_id 1
 -mpegts_service_id 1 -mpegts_pmt_start_pid 1000 -mpegts_start_pid 1001
 -metadata service_provider="YOUR CALL"
 -metadata service_name="COOL TV CHANNEL"
 -muxrate 3732k -y videots &
sudo ./tsrfsend videots 0 1280000 6000 4 1/2 1/4 8 0 0
Note that I am using “sudo tsrfsend” because I did not configure any udev rule for the modulator that would allow using it as regular user. If you want to run the application as regular user, create a udev rule as I showed it in my previous post.
In the example I am using 1.28 GHz carrier frequency which is in the DATV segment of the 23 cm amateur radio band. If you don’t have a DVB-T receiver that works at that frequency you can change it to some UHF frequency and use your regular digital television to receive it provided that it can do DVB-T and you are only transmitting in your lab with very low power. Check the regulations in your country to know for sure what you may and what you may not do.
I have modified the RTL2832, R820T and E4000 drivers to allow tuning to L-band frequencies as supported by these tuners.
We can also use ffmpeg to read from a file instead of the camera. In that case we use “… -re -i videoes …” to transmit in real time, otherwise ffmpeg will read and send the file as far as it can read it from the SD card. I haven’t tested this option much as I am only interested in live transmissions for now.
I hope this guide was helpful and I am looking forward to see who will make the first handheld HDTV transmitter using a Raspberry Pi and a UT-100C modulator and in particular who will make it work from a flying drone.
Awesome project! I’d be interested to learn how you tuned the RTL2832 to the 23 cm amateur band. You say you modified the drivers… Would you be able to post an example?
I found this to be a very interesting project. I have been on the lookout for a way to distribute audio and video to the atsc televisions around the house. The two “sources” I would like to distribute are a few SD cctv cameras ( that were distributed with now obsolete Channel Master RF modulators) and a library of MPEG2-TS recordings (high school sports).
I need to figure out a way to capture and multiplex the cctv cameras, perhaps as multiple SDTV subchannels or as a windowed HD. I really miss being able to put one of the cctv cameras as a pip on the television when expecting guests or a delivery truck to arrive.
Have you tried to dtv stream the raspberry’s gui display ?
I haven’t tried it but take a look at this project:
https://github.com/F5OEO/rpidatv
Hello,
Thank you for sharing this effort in such a detailed manner. We are trying to recreate your setup.
Raspivid is working fine individually, ffmpeg is working fine individually and so is tsrfsend.
Now, when we put all three together in a script (.sh) file, we see a burst (on a spectrum analyzer) and then the script execution stops.
Our objective is also to stream continuous video, may I ask you to please advise.
Thank you for your time in looking into my query.
Alex, please can you tell what is the delay (lag) if picture changes?
I don’t remember exactly, but ffmpeg muxer introduces a significant latency (~5 seconds). I think this article is now quite obsolete and anyone interested in this topic should take a look at rpidatv (and avc2ts) instead: https://github.com/F5OEO/rpidatv