Few weeks ago I posted some notes about using the Logitech HD Pro Webcam C920 with Gstreamer. I have since ported the setup to the Beaglebone, effectively turning my Beaglebone into a streaming IP camera that can deliver constant bitrate H.264 video at full 1920x1080p30 resolution without breaking a sweat.
As written in the previous post, the secret behind making this happen is to take advantage of the H.264 encoder inside the Logitech C920 camera. This requires Linux kernel 3.2+ and an application that understands the “H264 pixel format”. At the time of writing the list of applications is limited to one, namely qv4l2 from the v4l-utils package (correct me if I’m wrong). However, thanks to a hack I found on Github, I have managed to create an application that can acquire the raw H.264 stream from the C920 and save it to a file.
Please do read my previous post and get an understanding of what is involved in operating the Logitech C920 in H.264-mode. It’s a good idea to get used to the camera hardware and software on a host PC before trying to make it work on an embedded device. I am not going to repeat every single step here.
A more or less complete diagram of my Beaglebone camera system is shown below:
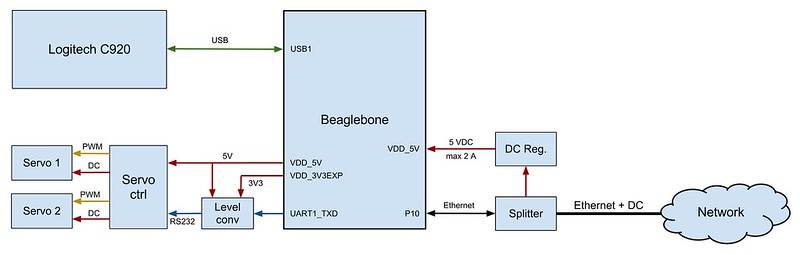
The system connects to the rest of the world using a single cable, providing both LAN connection and DC. It’s not PoE-compliant, just some DC over the spare wires. The Logitech C920 camera is connected to the USB host and I use UART1 to control a simple two-servo pan/tilt mechanism based on the Pololu Micro Serial Servo Controller. This may seem like overkill and indeed I could control the servos directly; however, using the serial interface provided by the servo driver is very easy and convenient.
The present demo mockup looks like this (it doesn’t have the Ethernet/power splitter):
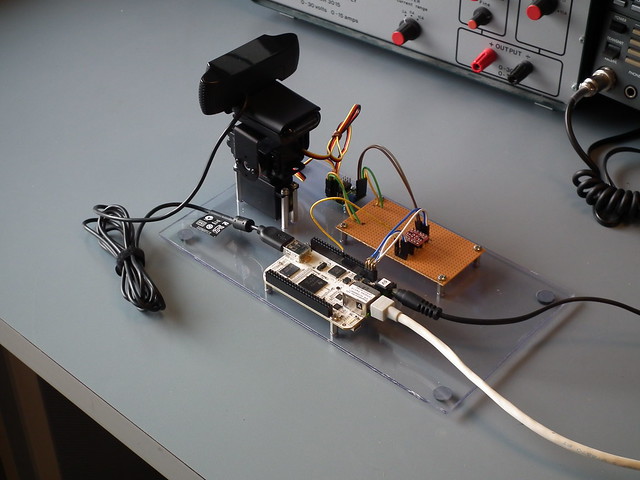
More photos in my Bonecam set on Flickr.
I intend to create a Beaglebone-sized daughter-board containing the DC regulator, the level converter and the servo controller, and mount it on top of the Beaglebone.
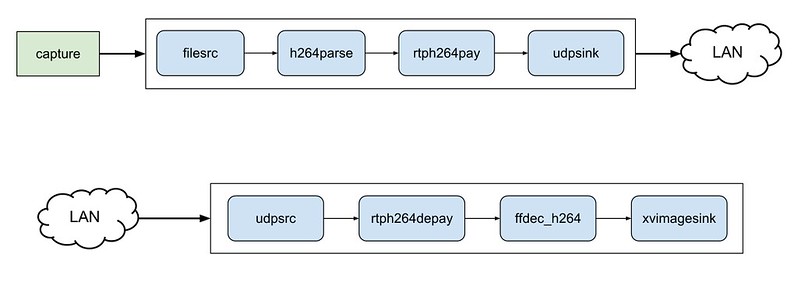
A diagram of the video server (and client) software is shown below. As you can see it is mostly a Gstreamer pipeline plus the capture application mentioned above:
The capture application is now maintained in my bonecam repository on Github together with some other stuff organized as follows:
- bonecam/angstrom — Patches and bitbake recipes to create a “bonecam image” for the Beaglebone. You do not necessarily need to create this image, but you do need to build gst-plugins-bad as instructed later.
- bonecam/camctl — A small application that I use for controlling the camera. Probably only useful for myself or those who replicate the pan/tilt control that I am using.
- bonecam/capture — The capture application with a simple build script. Compile it on target (there is no cross build script yet).
- bonecam/hardware — Data sheets and diagrams of various hardware components, mostly related to the pan/tilt construction.
- bonecam/scripts — Utility scripts to start the video server and client. Note that the camera must be configured to send H.264 prior to starting the server. There is also an SDP file that can be used to load into VLC allowing VLC to be the client.
At this time I do not have any automated way to make all this work so you will have do it manually following the steps provided in the bonecam/angstrom directory:
- Check out the Ångström setup scripts according to the instructions in the Building Ångström page. Perform the config and update from Step 2.
- Apply my “wannabe-patches” as follows:
- Copy angstrom/bonecam-image.bb to sources/meta-ti/recipes-misc/images/
- Copy angstrom/gst-plugins-bad_0.10.23.bb to sources/openembedded-core/meta/recipes-multimedia/gstreamer/ – this recipe will enable the h264parse plugin which is necessary for the server.
Copy the files from angstrom/v4l2apps to sources/meta-openembedded/meta-oe/recipes-multimedia/v4l2apps/ – tis includes a patch to disable qv4l2 which for some reason will attempt to build using the native Qt SDK (and fail miserably)
- You can now try to build the bonecam-image using: MACHINE=beaglebone ./oebb.sh bitbake bonecam-image
I realize this is not the right way to do things; however, until I have time to properly understand Ångström and Openembedded it will have to do. Feel free to contribute a better layout/setup that allows easy integration into the Ångström build system.
Once you have built the bonecam-image you need to transfer it to a bootable micro SD card. If you don’t have a procedure for that you can follow the “How to Unpack and Boot the Demo Image – the hard way” steps from the Ångström site but using the files you just created (they are located in build/tmp-angstrom_v2012_05-eglibc/deploy/images/beaglebone).
This image boots in less than 5 seconds and has very small memory footprint leaving plenty of RAM to applications.
Note that you will have to install the gst-plugin-h264parse manually as it is not automatically included in the rootfs. We should fix that together with the “creating a better setup/layout” todo-item mentioned above. You can copy all IPK packages over to the Beaglebone and install what is necessary locally.
One thing you will note while working with the C920 is that the compressor appears to deliver a 3.1 Mbps constant bitrate stream regardless of resolution and frame rate. Obviously this is too much for a 320×240 video, but it is acceptable for VGA and quite impressive for high definition. I know it is possible to do better than this, but I should perhaps also mention that the H.264 stream from the C920 has barely noticeable latency. For many applications low latency is much more important than data rate.
The bonecam/scripts directory also contains scripts for sending and receiving Vorbis-encoded audio over RTP. Using the settings in the script, the Beaglebone will survive and still have CPU cycles to spare. I’m looking into using CELT codec instead of Vorbis, but for some reason there is no libcelt available in Ångström. On a desktop PC I have had really good results using gstreamer and CELT and I would definitely like to make it work on the Beaglebone too.
Finally, I’d like to remark that this is still very much a work in progress. I haven’t spent any particular effort on trying to optimize the setup, yet it seems to be very efficient and robust. It has been streaming more or less 24 hours a day for weeks.
Have fun!
Changelog
2013.01.09: Updated to work with latest Ångström
2014.05.03: Updated repository links to to refer to v1.1 tag